Thursday, March 31, 2016

Shrimp Cakes

The shrimp cakes required several ingredients such as Tabasco sauce, breadcrumbs, chopped shrimp, mayo (We used the vegan mayo from the previous recipe), chives, green onion, celery, egg, salt and pepper.

Mise en place

The celery and green onions were cooked in butter until soft, then cooled to room temperature.

Celery and green onions
The rest of the ingredients were combined together.


The mixture was then shaped into bite size pieces, about the size of a half-dollar, after rolling it in additional breadcrumbs for a crispy outer coating.

Sample cake size
Ready to cook
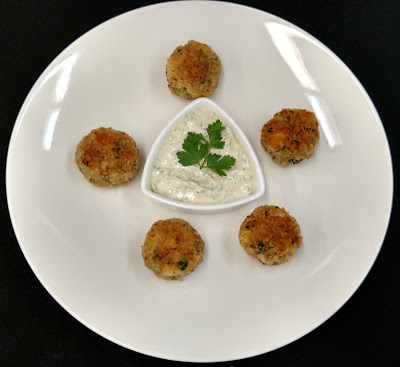
The cakes were cooked in butter on each side until golden brown, then plated with remoulade sauce.

Frying in the pan

Final plating

Prep: No problems with prep. We were careful to make sure each cake was about the same size.

Presentation: I went with a simple plating scheme with the sauce in the middle and the cakes surrounding it.

Taste: The shrimp cakes are nicely seasoned and have a crispy outer coating from the extra breadcrumbs. There is a good amount of shrimp in each bite. The remoulade sauce is somewhat reminiscent of a tartar sauce.

Overall: I'd definitely make this again, with possibly different types of seafood (Such as crab or salmon).

Wednesday, March 30, 2016

Vegan Mayo and Remoulade

Mayo without milk! This healthier but still tasty version of mayo relies on cashews and tofu as the main ingredients, with a lot of blending with thanks to the Vitamix.

Ingredients for mayo
We used the tofu cashew mayo to use remoulade. Some of the ingredients used were Tabasco, anchovy paste, chives, parsley, tarragon, cornichons, and capers.

Ingredients for remoulade

Once the ingredients were chopped they were combined to form the sauce.

Finished sauce

Queso Blanco

In addition to making roulade, we made our own cheese from milk. Milk was brought to 185 F, then salt and vinegar were added. The pot was kept on heat until the curds started to form, then taken off the heat. The curds were then placed in a cheesecloth and remaining water was squeezed out.

Adding vinegar

Starting to curdle

Curds forming

Close up of curds

Water squeezed out  
The cheese was kept in the cheesecloth and left overnight to harden. The next day we sliced and plated it.

Final plating
Prep: We needed to add more vinegar than the recipe needed to get adequate curds to form.

Presentation: The ball of cheese was cut in half and placed at an angle with lemon and parsley garnish.

Taste: The cheese is creamy and slightly salty. It would be a great topping for various dishes.

Overall: The cheese was fairly easy to make and has a pleasing taste.

Roulade

We made our own mozzarella cheese from cheese curds and made a roulade with prosciutto and fresh basil.

The first step was tearing the cheese curds into chunks


Water was heated until close to simmering, poured over the curds, and worked with our hands until smooth. We had a plastic wrapped half sheet pan which we spread the still-warm cheese over to form a rectangular layer. We then layered the cheese with prosciutto and basil on top.

Freshly sliced prosciutto

Prosciutto layer

Basil layer

I rolled up the cheese as tightly as possible, sealing the roll with plastic wrap and dunking the closure seam into hot water to meld the cheese together. A small amount of cheese on the top of the roulade did not have any layers on it to help seal the cheese better.

Roulade ready to seal

Vertical view

The cheese was left overnight to set. The next day, it was unwrapped, sliced and plated.

Final plating

Prep: The water needed to be very hot in order for the cheese curds to melt together. We kept a bowl of ice water out to dip our hands into to keep our hands from getting too hot while handling the cheese. Making the roulade was no problem, although I will try to roll the cheese layer tighter for next time.

Presentation: I experimented with different plating designs before deciding on a circular, layered pattern which creates more depth and visual flow.

Taste: The cheese has a mild creamy taste which meshes well with the salty prosciutto and fresh basil.

Overall: The roulade has many options for fillings and the pinwheel shape is visually appealing and can be arranged in different ways. I would definitely make this dish again.

Wednesday, March 23, 2016

Empanadas

Using the same filling from the wontons, we made empanadas. Asian fusion in a bite!

The dough was made from flour, shortening, cold water, and salt. I placed the bowl in an ice bath to keep the temperature as cold as possible and used forks to mix the dough to prevent warming it.

Mixing the dough

The dough was kneaded until just combined, placed in plastic wrap, and put in the fridge for 30 minutes. I then rolled it out on the cutting board until it was slightly thicker than a wonton wrapper. Cookie cutters were used to make easy cuts into the dough.

Cutting the dough


About a teaspoon of filling was placed on the dough with egg wash. The dough was folded over and then crimped with a fork. We then brushed egg wash on top of the empanada and placed it in a 350 F oven until browned.
Raw dough with filling

Close up of dough with filling

While prepping for the empanadas I also made teriyaki sauce with finely minced garlic, soy sauce, sugar, cornstarch slurry, ground ginger, black pepper, and apple cider vinegar.

Teriyaki sauce just combined, ready to heat and reduce

I used 5 empanadas for the final plating with the teriyaki sauce.

Final plating

Prep: The dough took the longest time to prep and needed a lot of care to make sure the dough wasn't overworked or dried out.

Presentation: I used a small sauce dish for the teriyaki sauce and placed the empanadas in a fan shape for more visual appeal. I might add the option of sriracha sauce or sambal for the plate in the future if people want more of a spicy sauce.

Taste: The outer crust was lightly crisp and flaky, yet slightly tender. The filling went well with the crust and crimping sealed the edges so there was no breakage when cooking.

Overall: I think this was a successful bite sized plate. Like the wontons, empanadas can have various fillings. Both savory and sweet fillings are possible with various flavors, which make them very adaptable to different occasions.

Fried Wontons

One of our first assignments was to make fried wontons. The filling was made for the wontons with ground pork and finely chopped or shredded mushroom, napa cabbage, red bell pepper, onion, garlic, and ginger. Coarsely chopped cilantro, oyster sauce, sesame oil and soy sauce were also used with salt and pepper to taste.

Finely chopped mushrooms
Weighing out the mushrooms

Finely shredded napa cabbage

The filling was cooked in a saute pan, browning the pork first, straining out the fat, adding the vegetables to the pan, and then re-adding the pork.

Cooked and ready to fill!
The wontons were folded into a triangle, then the two loose ends were pinched together with egg wash as a binder.

Ready to deep fry

The wontons were fried until golden brown, with teriyaki sauce as an accompaniment.

Final plating

Prep: No problems with prep. Most of the time used in making the wontons was from chopping all the ingredients.

Presentation: I relied on a simple presentation with a row of 5 wontons with 2 drizzles of teriyaki sauce. I might add more color to the plate by adding sambal or green onion to the dish if I were to plate this again.

Taste: The filling was well seasoned and cooked nicely. The wontons were fried to an ideal golden brown.

Overall: I think this was a successful "small bite" dish. It's a versatile dish since there are many ways you can adjust it for the future, by using different fillings, and folding the wontons in different ways. I usually fold wontons in the "Taiwanese" style (hua lian bian shi) so learning a new technique to fold was useful. In general, I think this folding style works better for frying since it holds up better in the hot oil and keeps more of a symmetrical shape.

Goals and Expectations

According to culinaryarts.about.com, garde manger means "keeping to eat" in French, and the term originally referred to a pantry or food storage area.

In the modern culinary arts, the term garde manger can refer to the chef who oversees cold food production. Similarly, garde manger can also refer to the specific area of the kitchen where cold food production takes place.
(Source: http://culinaryarts.about.com/od/glossary/g/Garde-Manger.htm accessed 3/23/16)
 
I did a lot of thinking before taking the next class after finishing the introductory class. I still wasn't sure if the culinary field was something I'd want to delve into, and taking the next class would be another time and money commitment. After learning that there would be some techniques I hadn't done before, in addition to learning more commercial skills like food costing, I decided to take the plunge and jump into the garde manger class.

In general I tend to cook a lot of main dishes, so making more appetizers and hors d'oeurves will be a good skill to learn. Learning more charcuterie techniques will be beneficial as well. I do a lot of smoking on our Big Green Egg at home (I make a pretty mean bacon), but haven't made any types of forcemeat before. Learning more about plate presentation will be another goal of mine as well.

Tuesday, March 8, 2016

Portfolio Final Thoughts

I learned some extra tips for cooking such as recipe conversion and how to navigate around a professional kitchen. I also found the section on food safety particularly valuable. You see so many stories of restaurants that are on the "Dirty Dining" list and you definitely don't want to be on that list as a dining establishment! There were a few assignments that I had already cooked at home prior to taking this class, but it was good to do them in a different recipe and in a professional kitchen to get the extra experience. Some new techniques I learned were the different vegetable cuts (Especially the tourne), tomato concasse, making bechamel sauce and buerre blanc. I had made spaghetti and linguine pasta before but it was a great experience making ravioli. Overall, it was an enlightening experience.


Comparison of knife skills:

First day in the kitchen

Last day

Comparison of plating and cooking skills:

First assignment

Last assignment/Final

Week 8: Final Project

Our last assignment was your choice of making:
  • Ravioli or salmon
  • Potatoes or rice
  • Your choice of vegetable(s)
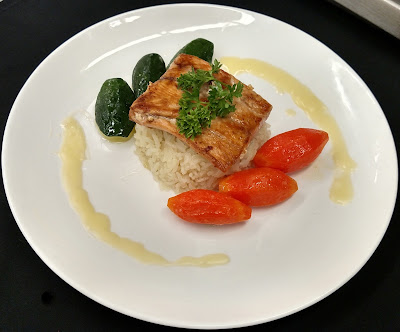
I went with a pan fried salmon with rice pilaf and glazed tourne vegetables.

I started the rice first since it needed time to cook in the oven. I used chicken stock, shallots, salt, pepper, bay leaf and butter with jasmine rice.

Finished rice pilaf

I tourne'd a set of 3 zucchini and carrot and par boiled them for a few minutes before blanching them. I also started on the buerre blanc, adding the shallots, seasoning, and white wine and reducing until the liquid was a syrupy consistency. I then added the butter pat by pat, monitoring the heat frequently to make sure the sauce didn't break.

Adding more butter to the buerre blanc

I used a glaze of butter, sugar, and salt in a saute pan and cooked the zucchini and carrot until done. At the same time I started the salmon, patting it dry, seasoning it, and pan frying it in clarified butter.

Final Plating
Prep: The biggest issue with prep was making the buerre blanc sauce. Due to the heat of multiple burners on at the same time in close proximity, the pot needed to be taken off the burners frequently so that it did not get too hot. Adding some more chilled butter helped bind the sauce back together when it was slightly starting to separate. For the glazed carrots and zucchini, I would use clarified butter for next time as the solids separated creating a white foamy appearance to the sauce which needed to be strained out and taken off the vegetables. The salmon was nicely browned but a small amount of white albumin exuded through the meat.

Presentation: I placed the salmon on top of a shaped bed of rice with the tourne vegetables along the side. I drizzled the buerre blanc sauce over the salmon and along the sides of the plate in a swirl pattern. A parsley garnish completes the plate. While I'm happy with the plate I would add the drizzled swirls of sauce in a quicker motion to create more of a fluid line.

Taste: The salmon is well cooked and tender. The vegetables were cooked and slightly sweet from the glaze. The buerre blanc went well with the salmon and vegetables, and the rice pilaf was tender and richly flavored from the butter and seasonings.

Overall: The plating is pleasing to the eye, the flavors all go well together, and all the elements are nicely cooked.

Friday, March 4, 2016

Week 7: Fried Chicken, Pan Gravy, Glazed Beets, Duchesse Potatoes

The beets were julienned and placed in a pan with the sugar and water and allowed to simmer.

Beets starting to cook

In the meantime, the potatoes were cooked, then mashed with butter, salt, and pepper.


They were placed in the piping bag and shaped into a flower-like pattern.


The potatoes were placed in the oven until the edges were golden brown


The gravy was made with chicken stock, flour and oil.


 A roux was made and the chicken stock added in, continuing to heat until thickened. Salt and white pepper were added to taste.


From the start the oil was placed on the burner to heat until 360 F.

Pot of oil

The chicken was fried until golden brown, then finished in the oven until it reached an internal temperature of 180 F.

Final plating:


Prep: The glaze on the beets was a little watery still on plating. I would reduce the sauce more for next time. No problems with the prep for the potatoes. The gravy was done before the chicken was ready and turned out a little thicker on plating from the continued heat. I would add some more water or stock to the gravy for next time to attain a better consistency. The chicken was still undercooked when the skin turned golden brown so it needed to be finished in the oven which extended the expected cooking time.

Presentation: I decided on spreading the beets in a fan shape, placing the chicken on a pool of gravy, with a duchesse potato below the chicken. I used parsley as garnish. I might add some of the beet glaze on the sides of the plate in a dot or swirl pattern to fill the empty space on the sides of the plate for next time. I also might restrict the chopped parsley to just the chicken or not at all.

Taste: The chicken had a crispy outer coating with tender chicken and was well seasoned. The gravy was thick but tasted good with the chicken. The beets were "al dente" and lightly sweet. The duchesse potato tasted good except for the cooked browned outer coating, which tasted dry. Maybe brushing some melted butter onto the cooked potatoes would make the texture better, or adding cream and/or more butter to the mashed potatoes before piping.
Overall: I think the dish was successful with plating, and overall tastes good.