Saturday, December 3, 2016

Honey Molasses Bacon


So. Are you drooling yet? There's nothing like home-cured and smoked bacon. Once you try it, the stuff you buy at the store in those thin plastic covered packages will never be the same. I use a few different recipes to cure my bacon and experiment with different smoking woods, but my favorites so far have been apple and cherry wood. This particular batch in the photo is made with a mixture of applewood and Jack Daniel's oak. This recipe uses honey instead of sugar, with a little extra depth of flavor from the molasses. I get my pink curing salt from outdoor sporting goods stores like Bass Pro Shops but you can also get it on Amazon (Since you can basically buy anything you can think of on Amazon). I used our Big Green Egg to smoke the bacon. Enjoy!

Honey Molasses Bacon
2-2.5 pounds pork belly
1/8 cup kosher salt
1 teaspoons pink curing salt
1/8 cup molasses
1/8 cup honey (dark honey preferred)
1 tablespoons red pepper flakes
1 tablespoons smoked sweet paprika
1/2 teaspoon black pepper

Combine all ingredients in a bowl, rub bacon with mixture. Place in a gallon ziplock bag and seal tightly. Place in fridge and let cure for 7-10 days, turning bag over and rubbing mixture into the pork each day. Rinse salt off of pork.

Set smoker or BGE to 225 F. Place smoking chips (Applewood is good) in with charcoal. Insert temp probe in pork belly and heat indirect until temp is 150, approx 1.5-2 hours. Let cool to room temperature on wire rack. Wrap tightly with plastic wrap and place in fridge. Slice when cool. Will keep for about a week in the fridge and a few months in the freezer.

Thursday, May 19, 2016

Mango Sticky Rice Rolls

I went to ChefStore the other day and scored a great deal on clearance soy paper sushi wraps. Since soy paper has a very neutral flavor I thought it would be great to experiment with non traditional types of sushi rolls. The first thing that came to mind was making Thai style mango sticky rice into a roll shape for a quick portable bite with the same flavor and ingredients. The flavor is very delicate and a mix of creaminess from the coconut milk and sweet/slight tart flavor from the mango. The sesame seeds add a textural component to the rolls and the lemon powder adds a little bit of nuanced acidity. You can also add a little bit of rum (Like a splash) to the coconut milk mixture for some extra kick.

Mango Sticky Rice Rolls

3-4 soy paper wraps 
1 cup glutinous rice
3/4 cup coconut milk
2 tablespoons sugar
pinch of salt
1/4 tsp lemon powder (Recipe below)
Roasted sesame seeds
1 mango, julienned

Wash the rice several times and soak in warm water for at least 3 hours, overnight is better. Place the rice in cheesecloth and steam it for 20 minutes. Place in a container and let cool until warm or room temperature. Meanwhile, heat the coconut milk, sugar and salt until boiling. Remove from heat, pour liquid into rice, stir and let the rice absorb the coconut milk.

Place a soy paper wrap on your plastic wrap covered sushi mat. Place rice onto soy paper and spread out, leaving about 1/2 inch of uncovered paper at the top. Sprinkle with lemon powder and sesame seeds. Layer the julienned mango in a row. Roll the wrap up using the mat. Seal the end of the soy paper with water. Slice into 1 inch pieces. 1 roll makes approximately 8 pieces.

Mise en place

Ready to roll


Lemon powder (Adapted from http://penandfork.com/recipes/cooking-tips/mandarin-orange-dust/):
Slice lemons (Preferably on a mandoline) thinly (As thin as you can slice them), layer onto a baking sheet and bake at 200 F for about 3 hours until slices are hard with no moisture in them. Put in a spice grinder and pulse until the slices form a powder.

Notes:
  • A very sharp, thin bladed knife works well for cutting the rolls without tearing or squishing them. Dip the blade in water each time you cut to prevent the rice from sticking to the blade. 
  • You can save them for later by wrapping the entire roll with plastic wrap and cutting them later. They keep for about a day or two until the rice starts to get hard.
  • Alternative version- for an extra treat you can dip the whole roll in flour, egg wash, and panko bread crumbs and deep fry it in a 375 F fryer until the outside is golden brown.


Thursday, May 5, 2016

Final Thoughts

Overall I think it was a successful class. I became more comfortable with handling phyllo dough, and learned how to make a lot of cold soups. Making terrines was especially interesting since I had never made them before. I enjoyed making small bites of food. The costing form we were given in class was also very helpful for any future endeavors into any culinary field. I was hoping to learn more about being in the professional industry rather than almost exclusively making dishes from recipes, but I was generally satisfied with my time here.

Final Project: Fried Wontons

The filling mixture was made from ground beef, ginger, scallions, oyster sauce, soy sauce, garlic, shredded cabbage, and sesame oil.

Mise en place

Meat filling

The filling was placed on a wonton wrapper, then the wrapper was folded into a triangle shape and twisted to form a boat shape. Egg wash sealed any folded edges.

Ready for the deep fryer
The wontons were placed in the deep fryer at 375 and cooked until golden brown. I made a sauce with soy sauce, oyster sauce, honey, sesame oil, ginger, garlic, and scallions. I also added some kimchi that was made in the penultimate class session.

Final plating

Prep: No problems with prep.

Presentation: I wanted to use the two sided sauce plate which was quite a large size so I had to use the largest plate that was available to create a visually appealing presentation. The wontons were arranged in a star pattern.

Taste: The filling is juicy, tender, and well seasoned. The wontons are crispy and provide a nice textural balance against the soft texture of the meat.

Overall: The only thing I would do differently for next time is to use the second fryer basket to submerge the wontons so that they are evenly colored. In this plating they have more of an ombre effect.


Final Project: Relish with Belgian Endive

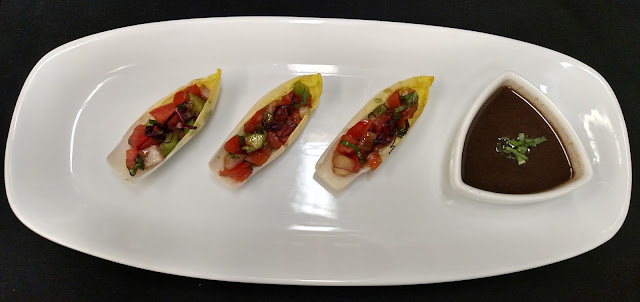
Our assignment was to make a relish based on what was left in the produce room, paired with Belgian endive. I went with an Italian style relish with tomatoes, shallots, and green pepper cut into small dice. I also made a chiffonade of basil and mixed it in. I made a balsamic vinaigrette and drizzled it onto the filled endives and added a chiffonade of radicchio on top.

Italian style relish with Belgian endive
Prep: No problems with prep.

Presentation: I went with a simple presentation of the 3 endives in a row, but placed at an angle to the plate to create more visual flow. The vinaigrette to the side has a chiffonade of basil on top to also create more visual interest.

Taste: The taste is fresh and crisp with some acidic flavor from the dressing.

Overall: With some adjustments to the balsamic vinaigrette for a richer flavor, I'd make this dish again.

Final Project: Mozzarella Roulade

For the first component of our final project, I shredded a 1 lb. block of mozzarella cheese into curds. I then poured hot water over the curds to reform them into a smooth ball. Once smooth and pliable enough to shape I placed the cheese on a plastic lined baking sheet and shaped it into a rectangle.
Shredded mozzarella
Reforming the cheese with hot water
I then placed a single layer of prosciutto on the cheese, and then fresh basil on top.

Prosciutto layer

Basil layer

The cheese was rolled tightly, sealed with plastic wrap, and then dipped in hot water to seal the edges. I placed it in the fridge to set until ready to slice.

Ready for the fridge
I sliced the roll on the bias and plated the pieces with some balsamic vinaigrette.

Final plating top-down view

Final plating front view
Prep: It took a bit of adjusting of the hot water temperature to get the cheese to spread out evenly with a smooth appearance. No other problems with prep. I ended up rolling the cheese a lot tighter than when I first made this in class which made it easier to plate.

Presentation: I placed the rolls along each side of the sauce tray, placed a radicchio chiffonade on top of each roll for added color, with parsley garnish along the sides and on the sauce. In hindsight I could have also used the vinaigrette in a drizzle along the plate instead of a static sauce dish.

Taste: The creamy mildness of the cheese goes well with the aromatic basil and salty earthiness of the prosciutto.

Overall: A great appetizer to make which is pleasing to the eye and to the palate.


Pea Puree

I sauteed leeks and onions in a pot until soft, then added lettuce and peas to cook briefly. Stock and a sachet d'epices was added and the mixture was simmered briefly. The sachet was removed and the vegetable mixture was placed in the Vitamix.
Mise en place

Simmering vegetables

Ready to puree
 The finished result was chilled and then cream was added for final plating.


Ham and Asparagus Phyllo Rolls

We placed asparagus spears in boiling water and then blanched them. We then placed the asparagus in a cheese-lemon mixture to coat. We then lined a baking sheet with parchment paper, placed the phyllo dough on it and brushed it with melted butter. Parmesan cheese, salt and pepper were added to the dough before the ham was placed and then the asparagus.
Mise en place

Ready to roll!
The phyllo dough was rolled tightly and more melted butter was brushed on the outer part of the roll.

Ready for the oven
We placed the rolls in a 400 F oven for about 15 minutes until they were golden brown and crispy.

Ready to cut and plate
I then sliced the rolls on a bias with a bread knife and plated them.

Final plating
Prep: We worked quickly as possible with the phyllo dough to prevent it from drying out and cracking. We used a generous amount of butter to keep the dough as moist as possible. No other problems with prep.

Presentation: I used a star-shaped presentation with a chiffonade of basil in the middle and pea puree in between the phyllo pieces. I think the presentation overall works well. There is balance in the plate, all the components flow well together and there is a sense of movement from the bias cut and the curls of basil chiffonade. I would make the pea puree dots more even for next time though.

Taste: The taste was too salty for me due to the ham with the salty cheese and additional salt for seasoning. I would limit a lot of the salt out for next time and use prosciutto for more depth of flavor and better texture.

Overall: With less of a salt component, I'd definitely make this dish again.

Swedish Meatballs

We started with ground beef, breadcrumbs, parsley, onions, celery, hot sauce, Worcestershire sauce, egg, salt and pepper. The onions and celery were first sauteed until soft and translucent.

Cooking the onions and celery

Mise en place
When the vegetable mixture was cool, it was combined with the meat and the rest of the other ingredients and shaped into bite size meatballs. The meatballs were then pan fried.

Cooking the meatballs
I tourneed some potato and carrot, parboiled them and sauteed them in butter until cooked, then added to the meatball plate. We also made some gravy for dipping the meatballs in.

Final plating, top-down view

Front view

Monday, May 2, 2016

Cold Roasted Tomato and Basil Soup

We first started by drizzling halved tomatoes with olive oil, garlic, and basil then roasting them in the oven until lightly browned.

Ready for the oven
After roasting in the oven
While the tomatoes were roasting I sauteed garlic in a pan, then onion, leek and celery until translucent and softened.

Garlic, onions, leek and celery
I then added fresh basil, bay leaf, the vegetables, tomatoes, and stock and simmered for about 40 minutes.
Chopped fresh basil
The bay leaf was removed and the mixture was placed in the Vitamix and blended until smooth
Ready to blend
The soup was placed in a hotel pan and chilled in the fridge until cool.

Ready to chill

Final plating
Prep: Prepping all the ingredients was fairly straightforward with no complications.

Presentation: I added some cream swirls and a small chiffonade of basil in the center for a simple presentation.

Taste: I liked the deep rich taste of the tomato from the roasting. The texture was a little grainy though despite blending it in the Vitamix for a long time.

Overall: I like the idea, but I might add some extra ingredients to make the soup less grainy tasting if I were to make this again.

Tuesday, April 19, 2016

Duxelles Stuffed Chicken Breast

We first started on the mushroom mixture. I roughly chopped crimini mushrooms into approximately brunoise size and minced some shallots. Other ingredients included heavy cream, parsley, breadcrumbs, salt and pepper.
Mise en place
I melted some butter in a saute pan and cooked the shallots until translucent.
Cooking the shallots
I then added the mushrooms, with salt and pepper to taste.
Adding the mushrooms
 When cooked, I combined the heavy cream, parsley, and breadcrumbs to complete the duxelles mixture.
Ready for the chicken
We used a mallet to pound out the chicken breast until it was evenly flat. We took the duxelles and placed it on the chicken, then rolled it up. I used a toothpick to bind the two open "seams" of the bottom part of the chicken.
Ready to roll
Ready for the oven
We placed the chicken in a 375 F oven for approximately 30 minutes. After taking the chicken out, we tested it to make sure the internal temperature was 165 F.
Cooked and ready to slice
I sliced the chicken into 3/8" pieces slightly on the bias and placed it in a fan pattern.
Final plating
Prep: No problems with prep.

Presentation: I went with a simple presentation, fanning the different slices out with a sprig of parsley in the middle. Some sauce would help to add some additional color and visual appeal.

Taste: The chicken was well cooked and tender with a good amount of seasoning. The mushrooms went well with the chicken and added some earthy flavor to contrast with the meat. I would add some sauce to the dish for an additional element if I were to make this next time.

Overall: This was a fairly easy dish to make and tasted great. I'd make it again.

Baba Ganoush

We cut an eggplant in half lengthwise and roasted it in the oven at 450 for 45 minutes.

Roasted eggplant
The eggplant flesh was scooped out with a spoon.
Eggplant flesh scooped out
Mise en place

Ingredients all blended together
Final plating